You have specified the perfect invisible drywall speakers for your living room and hidden your subwoofers in custom millwork. Your architectural audio foundation is solid. But when it comes to the primary media room or dedicated home theater, a basic in-ceiling 5.1 surround sound system simply will not cut it. It lacks the three-dimensional immersion required for a true cinematic experience.
As a homeowner who refuses to compromise on design or performance, you want theater-quality sound without hanging ugly, boxy speakers on your pristine walls. The solution is a fully integrated, in-ceiling Dolby Atmos layout. But if your general contractor or low-voltage integrator simply grabs a hole saw and starts drilling random circles in your custom plaster ceiling, you will end up with a “Swiss cheese” aesthetic and a sonic mess.
Here is the definitive guide to designing an in-ceiling 7.1 surround sound system that delivers reference-level Dolby Atmos performance while maintaining the flawless, unblemished sightlines of your ceiling.
The Death of 5.1: Why You Need Dolby Atmos and Height Channels
For decades, the ceiling surround sound speakers 5.1 configuration was the standard. It provided left, right, center, two surrounds, and a subwoofer. The problem? It is entirely two-dimensional. Sound moves around you, but it never moves over you.
Modern object-based audio formats like Dolby Atmos and DTS:X change the paradigm. Instead of assigning sound to specific channels, the audio engine assigns sound to “objects” in a 3D space. To reproduce this, we add “height” channels. This elevates the system from a 5.1 layout to a 7.1.4 layout.
- The 7: Left, Right, Center, two Side Surrounds, and two Rear Surrounds. (These can be a mix of 7.1 in-wall speaker system components for the sides/rears and in-ceiling for the front, depending on room architecture).
- The 1: The subwoofer(s), providing the low-frequency foundation.
- The 4: Four height channels (two front heights, two rear heights) mounted in the ceiling to reproduce the overhead effects like helicopters, rain, and ambient room acoustics.
The 7.1.4 Blueprint: Exact In-Ceiling Speaker Placement
To achieve the best in ceiling speakers surround sound performance, placement is not a guessing game; it is a precise science based on Dolby’s official guidelines. Your integrator must map these exact coordinates before the drywall is even hung.
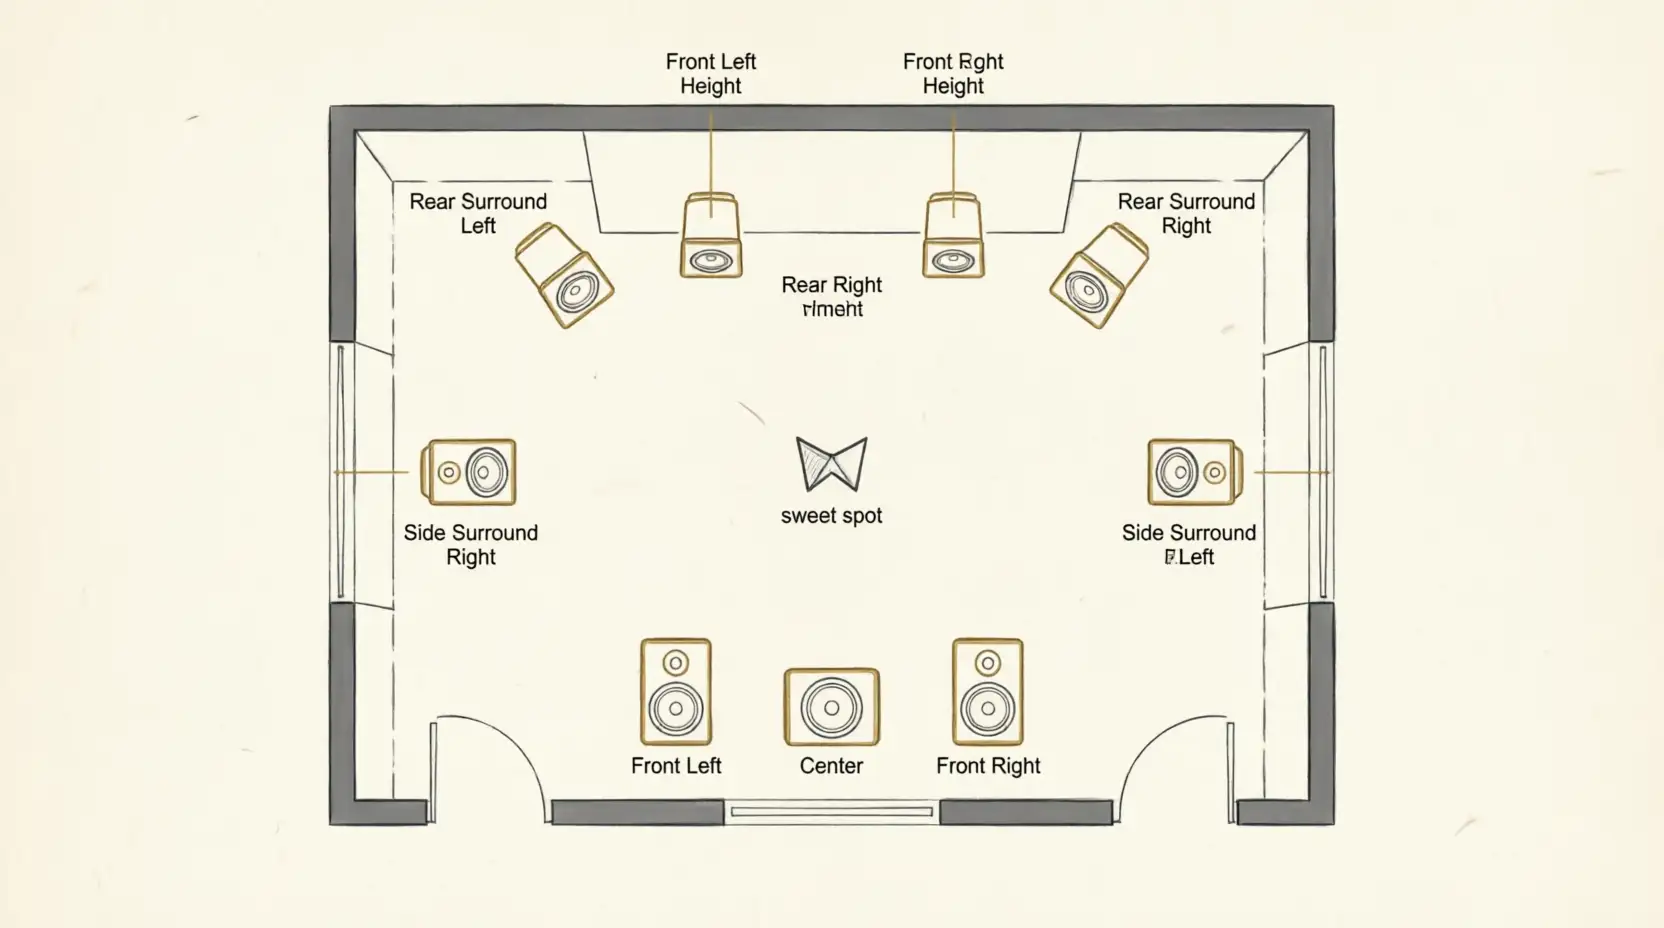
The Front Stage (Left, Center, Right)
While many use in-wall speakers for the front stage, if you are committed to an all-ceiling approach, the Left, Center, and Right speakers must be mounted in the ceiling, angled sharply downward toward the primary listening position (the “sweet spot”). They should be spaced evenly, roughly 2 to 3 feet apart, directly above the screen plane.
The Surround and Rear Channels
The side surrounds should be mounted in the ceiling slightly behind the primary listening position, while the rear surrounds are mounted further back. If your room allows, using a 7.1 in-wall speaker system for the side and rear surrounds (mounted at ear level in the walls) combined with in-ceiling speakers for the front and heights often yields a more cohesive, ear-level surround field. However, if wall mounting is impossible due to windows or millwork, in-ceiling surrounds are the next best option.
The Height Channels (The Atmos Magic)
This is where the magic happens. The four height speakers must be arranged in a rectangle above the listening area.
- The front height speakers should be in the ceiling roughly 2 feet in front of the listener’s head.
- The rear height speakers should be roughly 2 feet behind the listener’s head.
- The distance between the left and right height speakers should match the distance between your front left and right speakers.
This creates a perfect 3D dome of sound directly over your seating area.
The “Aimed” Advantage: Why Angled In-Ceiling Speakers are Non-Negotiable
If you take one thing away from this guide, let it be this: Never use flat, flush-mount in-ceiling speakers for a dedicated surround sound layout.
A standard in-ceiling speaker fires sound straight down. If you sit 10 feet away from the speaker, the high frequencies (which are highly directional) will bounce off the floor and walls before reaching your ears, resulting in muffled dialogue and a collapsed soundstage. The “sweet spot” becomes a tiny, unusable circle directly beneath the speaker.
To fix this, you must specify aimed in-ceiling speakers (often called “directional” or “angled baffle” speakers). These speakers feature a pivoting tweeter and mid-range cone that can be physically angled up to 15 to 20 degrees.
How to Angle for the Perfect Sweet Spot
Your integrator must angle every single in-ceiling speaker directly toward the primary listening position (usually the center of the main sofa).
- Front Speakers: Angled down and slightly inward toward the listener.
- Surrounds: Angled down and inward to create a cohesive “wall of sound” at ear level, even though they are in the ceiling.
- Heights: Angled slightly inward to focus the overhead effects directly onto the seating area, rather than washing the sound against the side walls.
This precise angling ensures that the high frequencies hit your ears directly, creating a massive, immersive sweet spot that covers the entire sofa, not just a single chair.
Aesthetics vs. Acoustics: Keeping the Ceiling Clean
An 11-speaker Atmos system means 11 holes in your ceiling. If not handled correctly, this will look like a commercial retail store. Here is how we maintain the high-end residential aesthetic:
- Micro-Perforated Grilles: Ditch the thick, ugly plastic grilles. Specify ultra-thin, micro-perforated metal grilles. They are virtually invisible from the floor and can be painted to exactly match your ceiling plaster or paint.
- Magnetic Grilles: Ensure the speakers use magnetic grilles rather than tension-ring grilles. Tension rings can warp the drywall over time and create an ugly shadow gap. Magnetic grilles sit perfectly flush.
- Bezel-Less Options: For the ultimate invisible look, specify bezel-less in-ceiling speakers. The grille magnetically attaches directly to the paintable surface, eliminating the visible plastic rim entirely.
- Symmetrical Layouts: Work with your designer to ensure the speaker layout is perfectly symmetrical relative to the room’s architectural features (coffered ceilings, beams, or lighting layouts). The speakers should look like an intentional part of the ceiling design, not an afterthought.
The Pre-Wire Reality: What to Tell Your GC and Integrator
Executing an in-ceiling 7.1 surround sound system requires rigorous pre-wire discipline. Do not let your electrician run speaker wire haphazardly.
- Separation from High Voltage: Speaker wire must never run parallel to high-voltage electrical lines within the same joist bay. If they must cross, they should cross at a strict 90-degree angle. This prevents electromagnetic interference, which causes a persistent, annoying hum in your speakers.
- Label Everything: Every single speaker wire must be labeled at both the ceiling junction box and the equipment rack. “Front Left” is not enough; it should be “FL – Ceiling Baffle 1.”
- Use Conduit for Heights: If possible, run the wires for the height channels through a flexible conduit. If you ever decide to upgrade to 9.1.4 or 11.1.4, having conduit in place means your integrator can pull new wires without cutting new holes in your custom ceiling.
Frequently Asked Questions
Can I use the same in-ceiling speakers for both music and Dolby Atmos movies?
Yes, but you need to choose the right speaker. Look for in-ceiling speakers with pivoting woofers and tweeters, and a rigid, well-damped enclosure. A speaker that sounds great for two-channel music will naturally excel in a Dolby Atmos surround layout. Avoid cheap, flimsy “builder-grade” ceiling speakers, as they will sound thin and tinny when pushed to movie volumes.
What if my ceiling doesn’t have enough depth for in-ceiling speakers?
Standard in-ceiling speakers require at least 5 to 7 inches of plenum depth. If you have a shallow ceiling, or if HVAC ductwork is in the way, you must specify “slim” or “shallow mount” in-ceiling speakers. Alternatively, this is where a plaster-over invisible speaker system in the walls can save the day, allowing you to keep the heights in the ceiling and move the surrounds to the walls.
Do I need an expensive receiver for a 7.1.4 system?
You need a high-quality, multi-channel processor and amplifier setup. While consumer AV receivers can process 7.1.4, they often lack the clean, high-current power required to drive 11 speakers dynamically without distorting. For a luxury home, we recommend separating the processing (pre-pro) and the amplification (multi-channel amp) to ensure pristine, distortion-free sound at any volume.
The Takeaway: Engineer the Immersion
Designing the best in ceiling speakers surround sound layout is about balancing uncompromising acoustic science with flawless interior design. You are not just buying speakers; you are engineering a three-dimensional soundfield.
Reject the outdated 5.1 standard. Demand a full 7.1.4 Dolby Atmos layout. Insist on aimed, directional baffles to lock in the sweet spot. And above all, ensure your integrator and contractor treat your ceiling with the respect it deserves, utilizing micro-perforated, magnetic grilles that vanish into the plaster.
When done right, the technology disappears. The ceiling remains a beautiful, unbroken canvas. And when you press play, the room simply melts away into the movie.